How to Install a Polycarbonate Windshield on Your Can-Am X3
- Inspect Lockable Latches:Check each latch for damage and ensure they are in good condition. Align and insert into the lower section of the windshield until they click into place.
- Check Mirror Bracket:Examine the mirror bracket on the top part of the windshield for any damage. Ensure screws are in place but not fully tightened for alignment adjustments.
- Prepare Vehicle:Loosen your Can-Am X3's roof latches and Velcro for space. Ensure the roof is adequately adjusted to avoid any damage and provide room for the windshield installation.
- Install Windshield:Lift and align the polycarbonate windshield with the vehicle frame, ensuring the bottom latches align with their slots. Press until latches click, securing the bottom part.
- Secure Top Section:Adjust the vehicle’s roof to slide the top part of the windshield underneath. Align and tighten the mirror bracket without exerting undue pressure to avoid warping.
- Finalize Installation: Reattach the roof latches and Velcro, ensuring a snug fit without any gaps. Check the entire setup for stability and flush alignment with the frame.
Today, we'll walk you through the installation process of a Polycarbonate windshield on your Can-Am X3, ensuring you're ready for the adventures ahead. Today, we'll walk you through the process of installing a polycarbonate windshield on your Can-Am X3, ensuring you're prepared for the adventures ahead.
What You Need
- Polycarbonate Windshield Kit: Make sure the kit is designed specifically for the Can-Am X3 windshield to guarantee a perfect fit and avoid any compatibility issues.
- Lockable Latches:These are typically included in your windshield kit. They play a crucial role in securing the windshield to your vehicle, so ensure they are complete and in good condition.
- Mirror Bracket: Also part of the kit, this component helps secure the upper part of the windshield. Verify its presence and inspect it for any damage.
- Basic Tools: Have a T30 and a 10mm wrench handy. These will be necessary for different steps of the installation process.
- Additional Materials: If applicable, prepare Velcro straps for adjusting your vehicle's roof. Also, gather a clean cloth and mild detergent for cleaning purposes.
To ensure a seamless and efficient installation process, gathering all necessary items beforehand is crucial.
Preparation
- Safety First:Park your Can-Am X3 on a stable, flat surface and ensure the ignition is turned off. Safety cannot be overstated; working on a stationary vehicle prevents accidents.
- Clean the Area: Use your clean cloth dampened with mild detergent to thoroughly clean the windshield mounting area on your UTV. Removing dirt and debris ensures a stronger adherence and a cleaner overall appearance.
- Unpack the Windshield:Carefully unpack your polycarbonate windshield. Avoid using sharp instruments that might scratch the material. Inspect the windshield for any imperfections.Explore more protective ways: How to Remove Scratches From a UTV Windshield
The correct setup can make the difference between a smooth installation and potential complications.

Installation Guide to Your Can-Am X3 Polycarbonate Windshield
1. Lockable Latches Configuration
Begin by carefully examining each lockable latch included in your kit. Check for any signs of wear, damage, or deformation that might compromise their function. These latches are crucial for securing the windshield firmly in place, so it's vital they are in perfect condition. If everything looks good, align each latch with its corresponding slot located on the lower section of your new polycarbonate windshield. Gently insert the latches, ensuring that each one slots in smoothly and audibly clicks into place. This click is your confirmation that the latch is securely locked and will hold the windshield firmly against your vehicle.
2. Mirror Bracket Assembly
Move to the top part of the windshield to address the mirror bracket. This piece is pivotal for the structural integrity and alignment of the windshield. Examine the bracket carefully, ensuring it's not bent or damaged. Check that the pre-installed screws are in place but not fully tightened—this will allow for slight adjustments as you align the windshield. Make sure the bracket lines up correctly with the corresponding part of your Can-Am X3's frame. The correct alignment is crucial for a secure fit and to prevent any vibrations or movement while driving.
3. Preparing Your Can-Am X3
Now, focus on the vehicle itself. Your Can-Am X3's roof needs to be slightly loosened to accommodate the new windshield. Locate the quick-release latches that secure the roof and gently release them. If your vehicle uses Velcro as part of its roofing system, gently peel back these straps to create enough clearance for the windshield. It’s essential to do this carefully to avoid damaging the roof's integrity and to ensure there's ample space to maneuver the windshield into position.
4. Installing the Windshield
With all preliminary checks and adjustments done, it's time to install the polycarbonate windshield. With a steady hand, lift the windshield, being careful not to touch the polycarbonate surface more than necessary to avoid scratches. Align the bottom edge with the frame of your Can-Am X3, specifically ensuring that the lockable latches are lined up with their respective slots. Gently press the windshield into place until you hear or feel the latches click, signifying that the windshield is correctly positioned and secured at the bottom.
5. Securing the Top Section
Next, address the top section of the windshield. Carefully adjust the roof of your Can-Am X3, lifting or moving it as necessary to allow the top part of the windshield to fit beneath. Pay special attention to the alignment of the pre-installed mirror bracket with its respective area on the vehicle's frame. This might require some slight adjustments to ensure a seamless fit. Once aligned, tighten the screws on the mirror bracket to secure it firmly in place. Be cautious not to overtighten, as this could put undue pressure on the polycarbonate material, leading to potential damage or warping.
6. Final Adjustments
After the windshield is securely installed, return to the roof of your vehicle. Carefully reattach the roof latches and press the Velcro back into place, if applicable. Ensure everything fits snugly without straining the material or creating gaps. There should be no excessive pressure on the windshield or roof that could lead to damage. Walk around the vehicle and visually inspect the newly installed windshield from all angles. It should sit flush against the frame, with no visible gaps or misalignments. A properly installed windshield will not only enhance the aesthetic appeal of your Can-Am X3 but also provide added protection and comfort while driving.
By following these 6 steps with attention to detail and care, even beginners can confidently install a polycarbonate windshield on their Can-Am X3.
Post-Installation Checks
Once the utv windshield is installed, performing these checks will ensure quality and safety:
- Inspect Your Work:Take a moment to carefully review the installation of your new polycarbonate windshield. Look for any signs of uneven spacing or gaps between the windshield and the vehicle's frame—these can be indicators of improper fitting. Ensure all sections are firmly in place and that there are no loose areas that could rattle or detach while driving. A perfectly fitted windshield should align seamlessly with the contours of your Can-Am X3, providing a smooth, flush finish.
- Test Drive:Before embarking on any long journeys, it's essential to conduct a slow, controlled test drive. This will allow you to assess the windshield's stability and performance in a safe environment. Pay attention to how the windshield responds to different speeds and terrains. Listen for any unusual noises that could indicate movement or vibration. The test drive is a critical step to ensure that the windshield remains stable and secure under various conditions.
- Cleaning:After installation and the test drive, clean the windshield thoroughly. Use a clean, soft cloth or sponge and a cleaner suitable for polycarbonate surfaces. Avoid harsh chemicals or abrasive tools that could scratch or damage the windshield. Regular cleaning not only maintains the clarity of your view but also allows you to inspect the surface closely for any signs of damage or wear that may need attention.
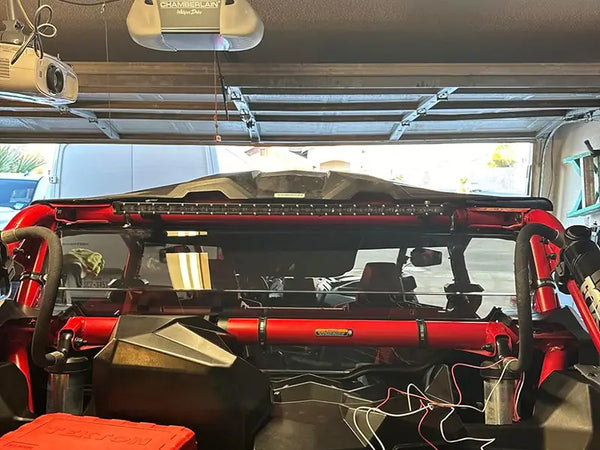
Maintenance and Seasonal Care Tips for Your Can-Am X3 Windshield
To ensure your windshield remains in top condition, integrating these practices into your routine will pay off in the long run:
- Regular Checks:Establish a routine to inspect the windshield's locks, brackets, and overall condition. Check that all parts remain tight and secure, with no signs of wear or damage. It's particularly important to monitor the condition of the locking mechanisms as they ensure the windshield's stability. Regular inspections and timely maintenance can significantly extend the life of your windshield and maintain your safety on the road.
- Cleaning:Proper cleaning is vital for maintaining visibility and the integrity of the polycarbonate windshield. Use only non-abrasive cleaners and soft cloths or sponges to avoid scratching the surface. Regular cleaning windshield not only enhances visibility but also prevents the buildup of dirt and debris that can cause wear and tear over time.
- Seasonal Care:Your windshield care routine should adapt to the changing seasons. In spring and summer, more frequent cleaning may be needed to remove pollen, dust, and insect residue. In autumn, ensure that leaves and other debris do not accumulate on or around the windshield, as they can retain moisture and cause damage. In winter, avoid using metal scrapers or boiling water to remove ice, as these methods can damage the polycarbonate material. Instead, use a plastic ice scraper and let the vehicle's defroster assist in melting the ice.
- Storage:If you plan to remove and store the windshield for any period, choose a location that is dry, cool, and away from direct sunlight, which can warp or discolor the material. If you would like to know more about windshield color,explore How to Tint Side by Side Full Windshields? Wrap the windshield in a protective covering, such as a soft cloth or bubble wrap, to prevent scratches and other damage during storage. If possible, store the windshield vertically or in a way that does not put pressure on any one point, which could lead to deformation.
By adhering to these maintenance and care guidelines, your Can-Am X3 polycarbonate windshield will remain in optimal condition, providing clear visibility and protection regardless of the season or storage conditions.
The Bottom Line
Installing a Polycarbonate windshield on your CanAm X3 can dramatically improve your riding experience. Not only does it provide protection from the elements, but it also maintains clarity in foggy conditions and resists scratches. By following this detailed guide, you can ensure a secure and proper installation, keeping you warm and protected during your off-road adventures.




Leave a comment